组件化、复用,这几乎是所有开发者追求的东西。Web Components就是为此而提出。可以使用来创建封装功能的定制元素,可以在你喜欢的任何地方重用,不必担心代码冲突。
这样的理念和Vue十分相似,专注于组件。所以Web Components或许是未来的方向!我在这里写一些Web Components的例子,供学习与参考!
假如您无法查看例子,请使用最新的Chrome访问该页面
自定义elements
Web Components通过CustomElementRegistry.define()来定义elements,目前有两种elements,独立的element与继承自基本的HTML element
独立的element
独立的element像<custom-element>这样的自定义标签。代码如下:
1
2
3
4
5
6
7
8
9
10
11
12
13
14
15
16
| customElements.define('custom-element',
class MyCustomElement extends HTMLElement {
constructor() {
super();
const pElem = document.createElement('p');
pElem.textContent = this.textContent;
pElem.style.color = 'red';
const shadowRoot = this.attachShadow({mode: 'closed'});
shadowRoot.appendChild(pElem);
}
}
)
|
1
| <custom-element>红色字体的段落!</custom-element>
|
实际的效果如下:
红色字体的段落!
继承自基本的HTML element
通过例如<p is='custom-p'>的方式调用,例如:
1
2
3
4
5
6
7
8
9
10
11
12
13
14
15
| customElements.define('custom-p',
class MyCustomElement extends HTMLParagraphElement {
constructor() {
super();
const pElem = document.createElement('span');
pElem.textContent = this.textContent;
pElem.style.color = 'red';
const shadowRoot = this.attachShadow({mode: 'closed'});
shadowRoot.appendChild(pElem);
}
},
{ extends: 'p' }
)
|
1
| <p is='custom-p'>红色字体的段落!</p>
|
实际的效果如下:
红色字体的段落!
生命周期回调函数
在自定义的element的构造函数中,可以指定多个不同的回调函数,它们将会在元素的不同生命时期被调用:
- connectedCallback:当 custom element首次被插入文档DOM时,被调用。
- disconnectedCallback:当 custom element从文档DOM中删除时,被调用。
- adoptedCallback:当 custom element被移动到新的文档时,被调用。
- attributeChangedCallback: 当 custom element增加、删除、修改自身属性时,被调用。
例如:
1
2
3
4
5
6
7
8
9
10
11
12
13
14
15
16
17
18
19
20
| customElements.define('other-custom-element',
class MyOtherCustomElement extends HTMLElement {
constructor() {
super();
}
connectedCallback() {
console.log('Custom square element added to page.');
}
disconnectedCallback() {
console.log('Custom square element removed from page.');
}
adoptedCallback() {
console.log('Custom square element moved to new page.');
}
attributeChangedCallback(name, oldValue, newValue) {
console.log('Custom square element attributes changed.');
}
}
)
|
Shadow DOM
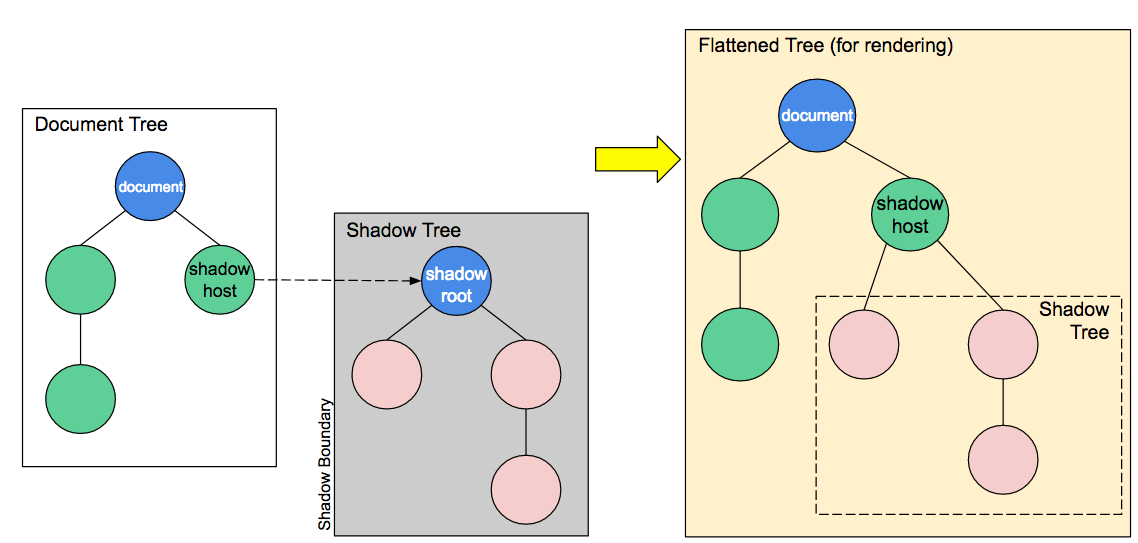
如图,Shadow DOM会在自定义标签解析时,加载到普通的DOM上。内部可以通过Element.attachShadow()来获取shadow root。它有一个mode属性,值可以是open或者closed,表示能否在外部获取Shadow DOM对象,一般而言应当为closed,内部实现不应该对外可见。
HTML templates
如果你熟悉Vue的话,这块与它很相似,是template与slot。
1
2
3
4
5
6
7
8
9
10
11
12
13
14
15
16
| <template id="person-template">
<div>
<h2>Personal ID Card</h2>
<slot name="person-name">NAME MISSING</slot>
<ul>
<li><slot name="person-age">AGE MISSING</slot></li>
<li><slot name="person-occupation">OCCUPATION MISSING</slot></li>
</ul>
</div>
</template>
<person-details>
<span slot="person-name">Morgan Stanley</span>
<span slot="person-age">36</span>
<span slot="person-occupation">Accountant</span>
</person-details>
|
1
2
3
4
5
6
7
8
9
10
| customElements.define('person-details',
class extends HTMLElement {
constructor() {
super();
const template = document.getElementById('person-template');
const templateContent = template.content;
const shadowRoot = this.attachShadow({mode: 'closed'});
shadowRoot.appendChild(templateContent.cloneNode(true));
}
});
|
实际效果如下:
Personal ID Card
NAME MISSING- AGE MISSING
- OCCUPATION MISSING
Morgan Stanley36Accountant
HTML Imports
这块存在争议,Mozilla认为将来应该用更合适的方式。不多做介绍。
参考
近期,打算利用这个技术写自己的个人主页!!